IntelliJ Project Setup
This guide walks through creating a new Tribot script project in IntelliJ IDEA from scratch. It assumes you've never used IntelliJ or Gradle before, but won't belabor the basics if you already have.
What is IntelliJ?
IntelliJ is a Java/Kotlin IDE made by JetBrains. It's the de facto standard editor for JVM development: code completion, inline documentation, refactoring, and tight Gradle integration all work out of the box. Tribot scripts are written in Kotlin or Java and built with Gradle, which means IntelliJ's defaults are already close to what you want.
Download the free Community Edition from jetbrains.com/idea/download.
Creating a new project
Open IntelliJ and choose New Project. You'll see a dialog like this:
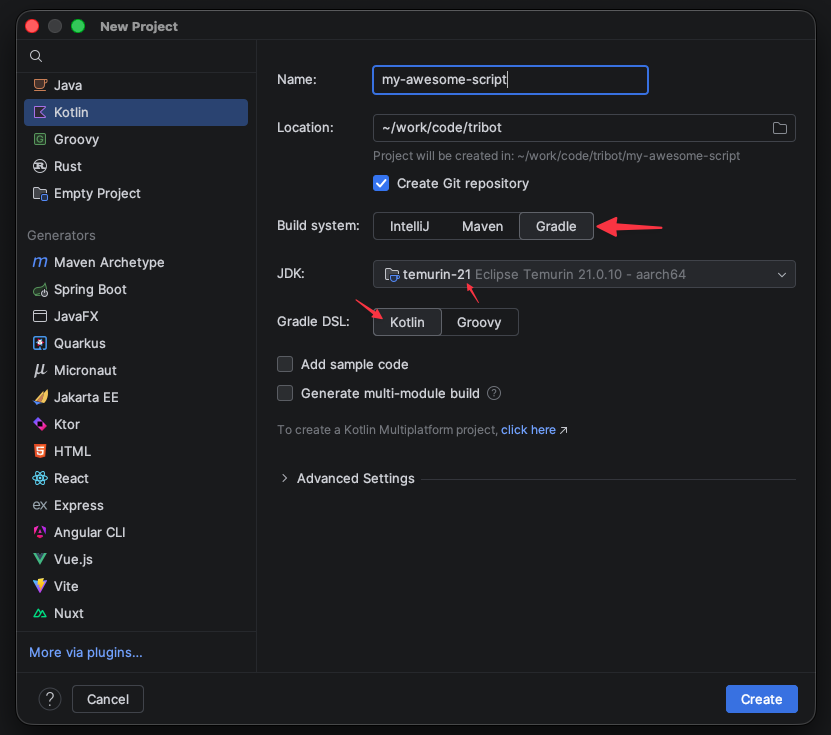
A few settings matter here, and the rest are just personal preference:
- Language: Kotlin. The Tribot automation SDK is written in Kotlin and examples throughout the documentation are in Kotlin. Java is supported too, but Kotlin is the path of least resistance.
- Build system: Gradle. The
tribot-dev-pluginis a Gradle plugin and will not work with Maven or IntelliJ's native build system. - Gradle DSL: Kotlin. Selecting Kotlin here produces
build.gradle.kts/settings.gradle.ktsfiles instead of the older Groovy.gradlevariants. Every snippet in the Tribot docs is Kotlin DSL. If you pick Groovy, you'll have to translate as you go. - JDK: 21. Tribot's runtime and the dev plugin both target JDK 21. A different JDK version will either fail to compile or produce class files that Tribot can't load. If JDK 21 isn't in the dropdown, choose Download JDK and pick any vendor (Temurin is a safe default).
You can leave "Add sample code" checked or unchecked. You'll be replacing the generated code anyway.
Click Create and let IntelliJ finish its first Gradle sync. This can take a minute on a fresh install because Gradle is downloading itself, the Kotlin compiler, and its initial dependency set.
The IntelliJ layout
Once the project opens you'll be looking at something like this:
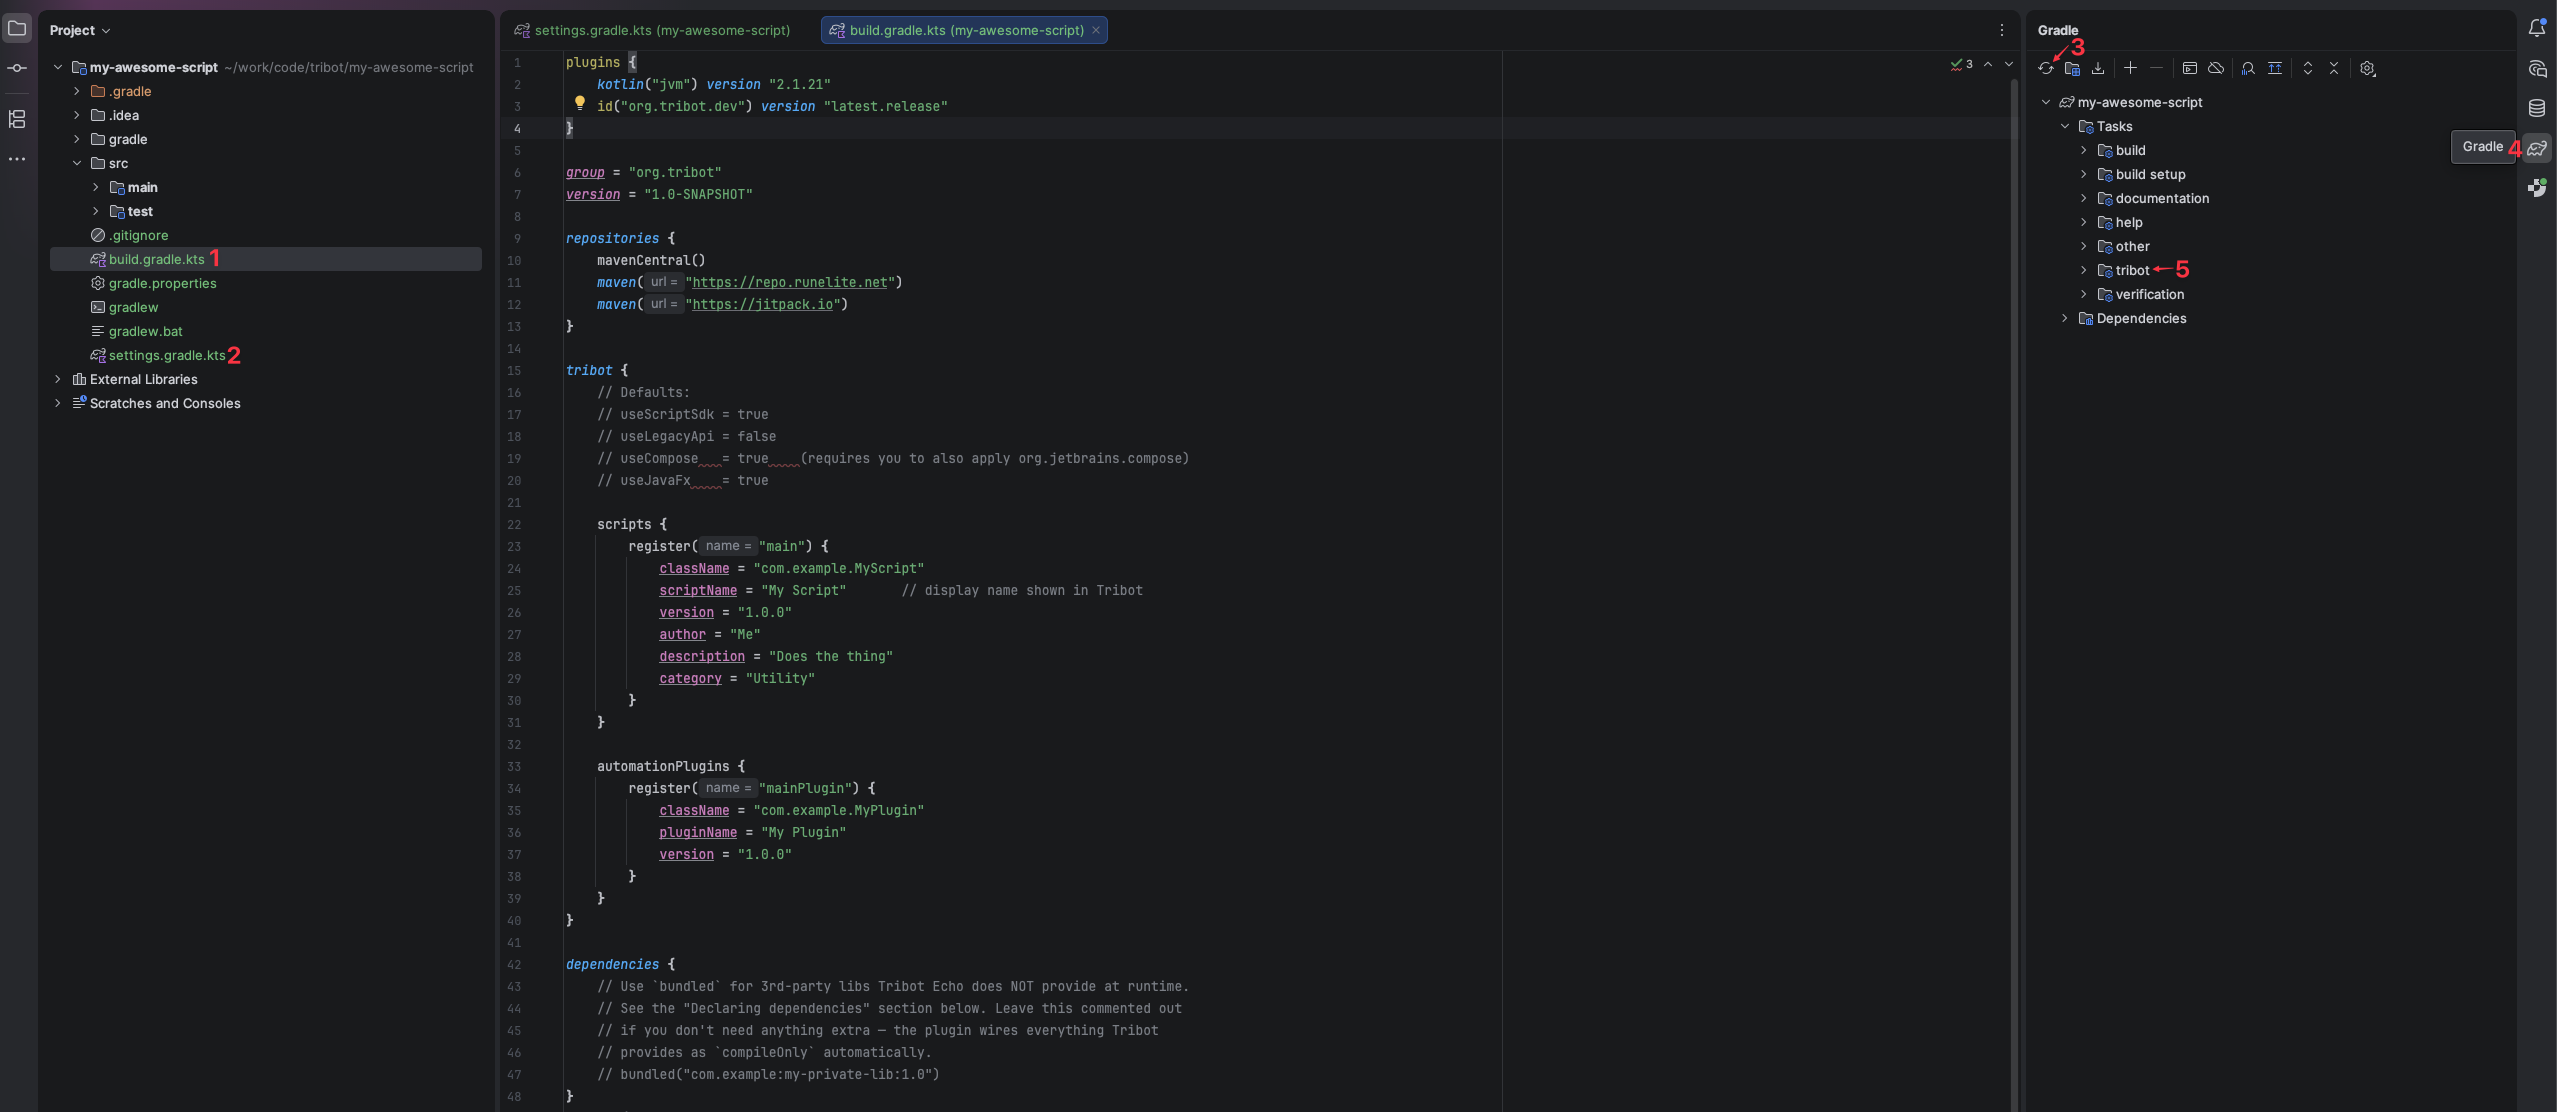
The numbered labels in the screenshot point to the five things worth knowing about before you start editing anything:
1. build.gradle.kts — the build script for your project. This declares which plugins to
apply (including org.tribot.dev), which dependencies to pull in, and the tribot { } block that
registers your scripts with the Tribot runtime. Everything configurable about how your project
is built lives here, and it's the file you'll edit most often outside of your actual script code.
2. settings.gradle.kts — the settings script. It tells Gradle the project's name, which
subprojects exist (if any), and, importantly for Tribot, where to resolve the org.tribot.dev
plugin from. You'll edit this file once during setup to wire up the Tribot plugin repository, and
rarely touch it again after that.
3. The Gradle refresh button — the circular reload arrow at the top of the Gradle tool window.
After any change to build.gradle.kts or settings.gradle.kts, whether that's adding a
dependency, bumping a version, or registering a new script, IntelliJ needs to re-sync Gradle's view
of the project before the editor catches up. If autocomplete is suddenly missing a class you just
added a dependency for, or a new script entry isn't being picked up, the answer is almost always
reload Gradle. When in doubt, refresh.
4. The Gradle tool window tab — the button on the right edge that opens this panel. The tool window is the control panel for every Gradle task your project can run. Double-click any task to execute it, and keep this panel handy because you'll come back to it constantly.
5. The Tribot section (inside the Gradle panel) — once the plugin is applied, the dev plugin's
tasks show up here. You'll be running fatJar (to build a deployable script JAR) and
deployLocally (to build and copy the JAR straight into your local Tribot automations directory)
from this section. If you apply the plugin and refresh Gradle but don't see these tasks, the
plugin hasn't resolved yet, so refresh again.
Two shortcuts for the editor area in the middle while you're here: hovering a symbol shows inline
documentation, and Ctrl+B (or Cmd+B on macOS) jumps to a symbol's definition. These are how
you explore the SDK without leaving the editor.
Adding the Tribot dev plugin
The fresh project IntelliJ generated knows nothing about Tribot yet. Wiring in the
tribot-dev-plugin is a two-file change: one block in settings.gradle.kts to tell Gradle where
to find the plugin, and one block in build.gradle.kts to apply it.
settings.gradle.kts
The Tribot dev plugin is published through JitPack, which doesn't publish the Gradle plugin marker
that would normally map the org.tribot.dev plugin ID to its module coordinates. To work around
that, we tell Gradle to resolve the plugin ID against the JitPack module directly. Replace the
generated settings.gradle.kts with:
pluginManagement {
    repositories {
        gradlePluginPortal()
        maven("https://jitpack.io")
    }
    resolutionStrategy {
        eachPlugin {
            if (requested.id.id == "org.tribot.dev") {
                useModule("com.github.TribotRS.tribot-dev-plugin:plugin:${requested.version}")
            }
        }
    }
}

rootProject.name = "my-awesome-script"
You only touch this file once. If you ever grow the project into multiple subprojects you'll add
include(...) lines below rootProject.name, but for a single-script project this is the whole
file.
build.gradle.kts
Now apply the plugin in your build script. Replace the generated contents with:
plugins {
    kotlin("jvm") version "2.1.21"
    id("org.tribot.dev") version "latest.release"
}

repositories {
    mavenCentral()
    maven("https://repo.runelite.net")
    maven("https://jitpack.io")
}

tribot {
    scripts {
        // script entries go here (covered in the next section)
    }
}
A couple of notes on what's happening:
version "latest.release"pulls whatever the newest tagged release of the plugin is. The automation SDK is wired up the same way internally, so your compiled code stays in lockstep with whatever Tribot's runtime is currently shipping. If you need reproducible builds (for example in CI), pin a specific version instead, likeversion "v1.0.5".- The three repositories matter.
mavenCentralprovides Kotlin and most ordinary libraries,repo.runelite.netprovides the RuneLite API, andjitpack.iois where the Tribot plugin and automation SDK live. Drop any one of these and something won't resolve. - You don't need to declare Tribot's APIs as dependencies. The plugin wires the automation SDK,
the script SDK, RuneLite, and a long list of bundled libraries (okhttp, gson, Guava, JavaFX,
Compose, and more) as
compileOnlyautomatically. If you need a 3rd-party library that Tribot doesn't ship with, declare it underdependencies { bundled("...") }so it gets packed into the fatJar — see the plugin README for details.
Refresh Gradle
After saving both files, hit the Gradle refresh button (label 3 in the layout screenshot
above). IntelliJ will download the plugin and the SDK, and once the sync finishes you should see a
Tribot section appear inside the Gradle tool window with tasks like fatJar and
deployLocally. If that section doesn't show up, something didn't resolve — check the Gradle sync
output at the bottom of the IDE for errors before moving on.
Script registration
The tribot-dev-plugin generates an echo-scripts.json manifest at build time from the
tribot { scripts { ... } } block in your build.gradle.kts. Each register(...) entry tells
Tribot about one script your JAR exposes.
A typical entry looks like:
tribot {
    scripts {
        register("main") {
            className = "org.tribot.MyScript"
            scriptName = "My Awesome Script"
            version = "1.0.0"
            author = "You"
            description = "Does the thing"
            category = "Utility"
        }
    }
}
The property that trips people up is className. It must be the fully qualified class name
of the class in your project that implements TribotScript. If it doesn't match exactly, Tribot
will fail to load the script at runtime — often with a ClassNotFoundException — because the
manifest is pointing at a class that doesn't exist.
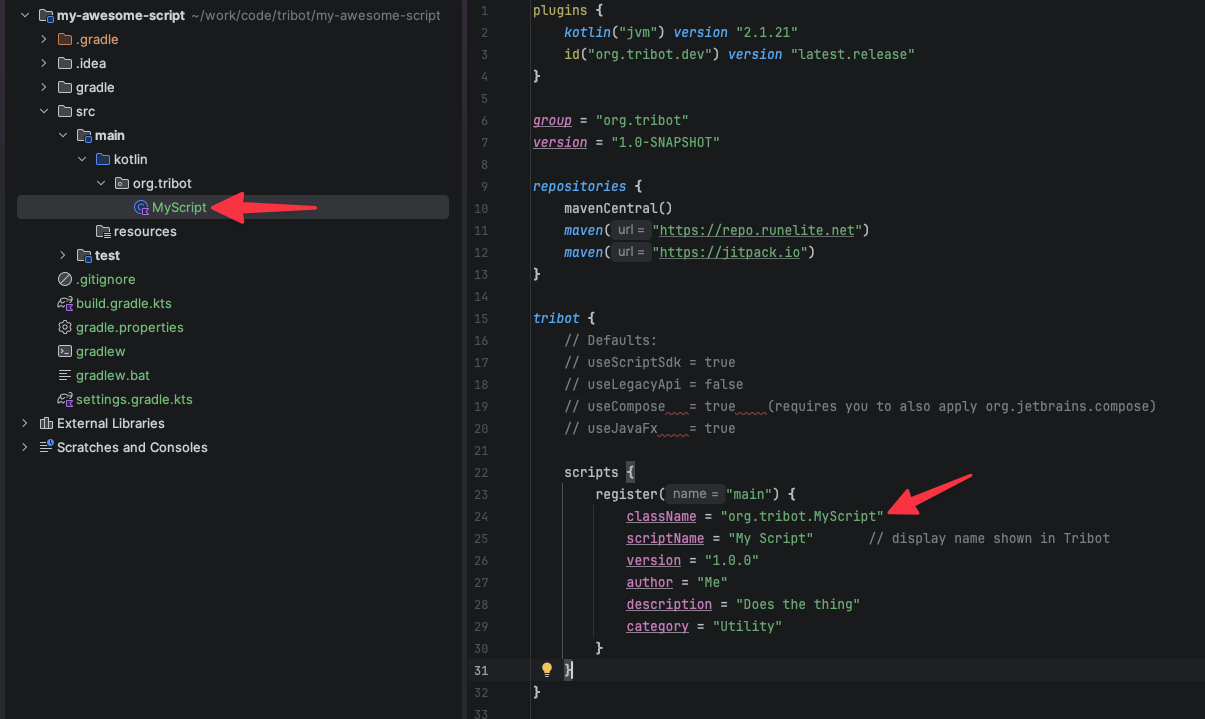
What is a fully qualified class name?
A fully qualified class name (FQCN) is the class's package plus its class name, joined with dots.
If you have this file at src/main/kotlin/org/tribot/MyScript.kt:
package org.tribot

class MyScript : TribotScript { /* ... */ }
…then the FQCN is org.tribot.MyScript. The package declaration at the top of the file is the
prefix, the class name is the suffix, and they join with a dot. Rename the class or move it to a
different package and the FQCN changes — so the className in your build.gradle.kts has to move
with it.
A quick sanity check: in the IntelliJ project tree, the folder path under src/main/kotlin/
should mirror the package name, and the filename should match the class name. If those three things
(folder path, package statement, className in Gradle) don't line up, something will break.
Writing a script class
A Tribot script is any class that implements the TribotScript interface from the automation SDK.
The interface has a single method — execute(context: ScriptContext) — and that method is your
script's entry point.
A minimal script:
package org.tribot
import org.tribot.automation.TribotScript
import org.tribot.automation.script.ScriptContext
class MyScript : TribotScript {
override fun execute(context: ScriptContext) {
// your script logic goes here
}
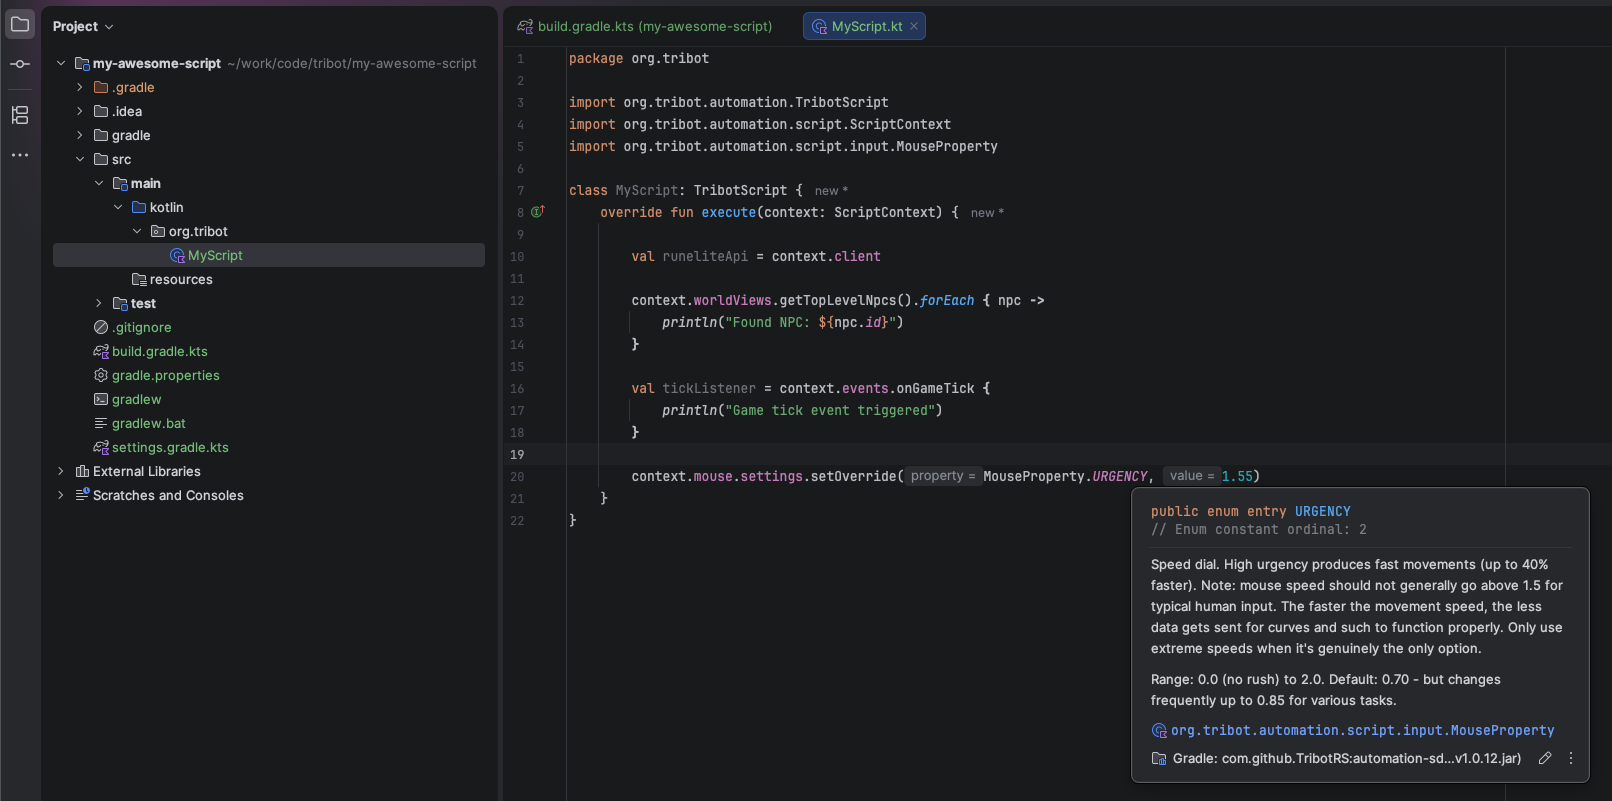
}What is ScriptContext?
ScriptContext is the object Tribot hands to your script when it starts. It's the entire public
surface of the automation SDK, namespaced by concern. You don't construct it and you don't store it
in a singleton — you just use the context parameter that execute gives you.
A few of the things hanging off it:
context.client— the underlying RuneLiteClient, for raw game state.context.mouse,context.keyboard,context.interaction— input.context.inventory,context.equipment,context.banking— inventory/bank/equipment tab access.context.skills,context.prayer,context.combat,context.magic— skill and combat state.context.camera,context.minimap— camera and minimap control.context.waiting— utilities for delays and polling conditions.context.events— subscribe to and emit game events.context.logger— structured logging that surfaces in Tribot's UI.
You don't have to memorize any of this. The automation SDK ships full KDoc, and because the
tribot-dev-plugin pulls the SDK in with sources attached, IntelliJ loads the documentation
automatically. Hover any property or method on context and the docs pop up inline, as shown in
the screenshot above. Ctrl+Click (or Cmd+Click) on a type to jump into the SDK source and
browse everything available.
That's the fastest way to learn the SDK: start typing context. in your execute method, let
autocomplete show you what's available, and read the inline docs as you go.
Building and deploying
With a registered script class matching a real FQCN, you can build and deploy:
./gradlew fatJar— produces a deployable JAR inbuild/libs/../gradlew deployLocally— builds the JAR and copies it into your local Tribot automations directory, where the Tribot client will pick it up on next launch. This is what you'll be running to test your script changes.
Both tasks are also available by double-clicking them in the Gradle tool window.
From here, the rest of script development is writing code. When you add a new script class,
remember to register it in tribot { scripts { ... } }, reload Gradle, and rebuild.
Advanced: multi-module projects and bundled dependencies
Everything above assumes a single-module project with one or two scripts in it. That's the right shape for getting started. Once you're writing a lot of scripts, or scripts that share code, the dev plugin has two features worth knowing about.
Multi-module projects
The plugin is happy to be applied across a Gradle multi-module project, which is how the
Tribot Community Automations
repository is organized: one root project with dozens of script sub-modules and a few shared
library sub-modules, each with its own build.gradle.kts and tribot { scripts { ... } } block.
The layout looks like this:
my-automations/
  settings.gradle.kts
  build.gradle.kts           (optional root config shared by all submodules)
  my-shared-library/
    build.gradle.kts
    src/main/kotlin/...
  woodcutter/
    build.gradle.kts
    src/main/kotlin/...
  fisher/
    build.gradle.kts
    src/main/kotlin/...
In settings.gradle.kts, list the subprojects:
rootProject.name = "my-automations"

include(
    "my-shared-library",
    "woodcutter",
    "fisher",
)
Each script sub-module applies id("org.tribot.dev") in its own build.gradle.kts and declares
its own tribot { scripts { register(...) { } } } block. Running ./gradlew deployLocally
deploys every script across the whole project at once, and individual tasks like
:woodcutter:deployLocally let you deploy one at a time.
If you have shared code (utilities, common behaviours, UI components), put it in its own sub-module and depend on it from your script sub-modules using Gradle's project-dependency syntax. Read on for how to bundle that shared code into the deployed JAR.
The bundled configuration
Tribot Echo already provides a large set of libraries on its runtime classpath: the automation SDK,
the script SDK, RuneLite, okhttp, gson, Guava, the Apache Commons family, JavaFX, Compose Desktop,
and more. The dev plugin wires all of these in as compileOnly automatically, so you can import
them in your code without declaring anything. Because those libraries already exist at runtime
inside Tribot, the fatJar does not re-bundle them — doing so would just bloat the JAR.
But when you need something Tribot doesn't ship with — a private utility library, a niche
parsing library, your own shared sub-module — you need it inside the fatJar so Tribot can load it
at runtime. That's what the bundled(...) configuration is for.
dependencies {
    // An open-source Tribot library published to JitPack
    bundled("com.github.TribotRS:some-tribot-library:latest.release")

    // A third-party library Tribot Echo doesn't provide (complex dependencies may not work properly!)
    bundled("com.example:my-private-parser:1.2.3")

    // A shared sub-module from this same multi-module project
    bundled(project(":my-shared-library"))
}
bundled is a Gradle configuration the dev plugin adds to every consumer project. Anything listed
there is:
- on the compile classpath, so you can
importthe library in your script code; - on the runtime classpath, so local tests and
gradle runwork; - packed into the fatJar, so it's present inside Tribot Echo when your script loads.
bundled vs implementation — the common footgun
The temptation for anyone familiar with Gradle is to declare 3rd-party libs with
implementation(...). Don't. implementation puts the library on the compile classpath but
does not bundle it into the fatJar. Your code will compile, IntelliJ will be happy, and the
script will blow up at runtime inside Tribot Echo with a ClassNotFoundException. If Tribot
doesn't already provide the library, use bundled. If it does provide it, don't declare it at all,
the plugin has already wired it as compileOnly for you.